Innovation can solve a lot of problems and bring to light new and creative ways to use the materials and tools that are around us. In industry, the benefits of innovation go even further. With a clever idea, a company can market a new product that can greatly improve the quality of life or even use materials that would otherwise be discarded. This is a challenge of engineering, coming up with new functions for by-products of manufacturing processes or widening the potential of already available objects. For this project, I got to do just that.
|
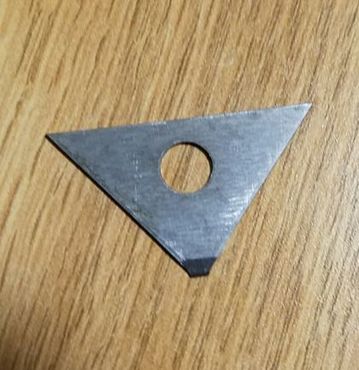
Project Goals: Black & Decker, as a result of the manufacturing process that produces box cutter blades, has many little blades (shown on the left) that have no application..yet. The goal is to create a tool that uses these left over blades. The device must be made via 3D printing and must incorporate some sort of control mechanism; the blade itself cannot be altered. This project was completed in a group.
Learning Objectives: In order to complete this project, the following skills had to be employed:
|
Designing
The first step in completing this project was coming up with a design for a useful tool that meet the requirements. This in itself was tricky; finding an innovative product that uses such a small blade was tough. To brainstorm, each member of the group came up with a design and we all pitched our tools to each other:
The first step in completing this project was coming up with a design for a useful tool that meet the requirements. This in itself was tricky; finding an innovative product that uses such a small blade was tough. To brainstorm, each member of the group came up with a design and we all pitched our tools to each other:
|
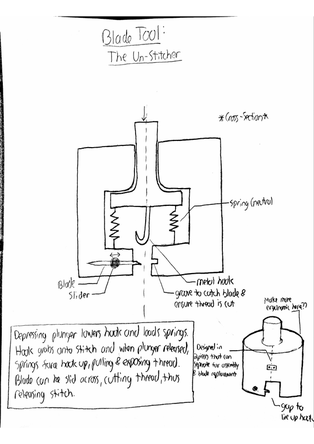
My Design:
The Un-Stitcher, There are many instances when someone has to undo a stitch (either because they made a mistake while sewing or because they need to alter an object). However, the process of undo-ing a stitch can be a tedious, repetitive, and sometimes precarious action. To undo a stitch, the procedure is usually to use a needle to lift up the thread of the stitch, then while holding it, using a pair of scissors to cut it. This is a slow process because it takes time to line up the needle, pull the stitch so its safely above the fabric and make sure it doesn't slip. Plus, there are some instances where the scissors used can accidentally cut a finger. This therefore takes time and can make the repetitive process of removing multiple stitches slow. Here's where this product comes in. By depressing the plunger, all the user has to do it line up the hook with a stitch and hook onto it; that's it. when the plunger is released, the stitch is raised above the fabric and by using the slider, the stitch can be cut. This makes the process easy, faster, and safer because the blade is out of the way of any appendages. This is also easy to print, and if its made in 3 parts, it can be easy to assemble and replace the blade. Also this can be made to be pretty small and out of the way. |
|
Group Member 2 Design:
"The safe box opener, the blade can be used in a box cutter that can be marketed as reducing liability in the work place or allowing your kids to use it. It could have a small handle with a piece of plastic that covers the blade until you put pressure on the device. The tool would be used to cut through the tape on boxed in order to open them." |
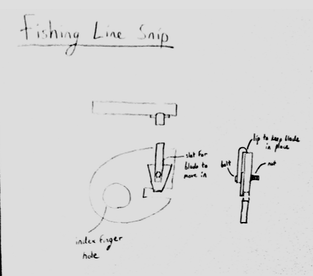
Group Member 3 Design:
"The fishing line cutter, the user puts their finger though the index finger hole and use their thumb to lower the blade to cut the line. It fits in the palm of the hand, and the bolt holding the blade, button, and base together allows for easy replacement of the blade and ambidextrous switching of which side the blade is on." |
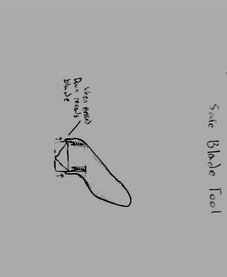
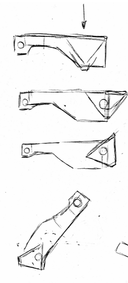
Group Member 4 Design:
"A portable blade that can be adjusted to an angle, to cut the user would hold down with their thumb and/or directly use it by pressing down on the arrow. It would be small and easy to carry and have a detailed molding good for grip as well as a hole to make it a key chain. It would be good as a device to cut string or some kinds of wire with its dual functionality." |
|
|
|
As a group, we decided to continue with group member 3's design. The group very much like that design as well as mine due to the innovative use of the blade. What set group member 3's design above mine, however, was the fact that their design was much simpler; it could be completed in the allotted time much easier than mine. That being said, I may still create this product in my own time as a personal project.
Modeling
The next step was to model the tool on Solidworks. As a group, we all sat down in front of my computer and worked on creating the tool. The main goal was to make the tool ergonomic since it had to fit in the palm of ones hand comfortably. Another design consideration was how to make the plunger function without the need for a spring. Rather than use a spring, we decided to have the user manually pull the blade up after the plunger has been depressed. Next, the design had to be made such that the blade could easily be removed for replacement and the plunger mechanism could be switched to either side in order to be accessible for everyone. Finally, a safety mechanism was decided on in order to hold the blade at a neutral position when not in use; this was to prevent any chance of someone getting hurt by the sharp edge of the blade. After two hours of CAD-ing, we came up with a design that met these needs. The entire tool could also be printed in only three parts, which would make assembly easy.
The next step was to model the tool on Solidworks. As a group, we all sat down in front of my computer and worked on creating the tool. The main goal was to make the tool ergonomic since it had to fit in the palm of ones hand comfortably. Another design consideration was how to make the plunger function without the need for a spring. Rather than use a spring, we decided to have the user manually pull the blade up after the plunger has been depressed. Next, the design had to be made such that the blade could easily be removed for replacement and the plunger mechanism could be switched to either side in order to be accessible for everyone. Finally, a safety mechanism was decided on in order to hold the blade at a neutral position when not in use; this was to prevent any chance of someone getting hurt by the sharp edge of the blade. After two hours of CAD-ing, we came up with a design that met these needs. The entire tool could also be printed in only three parts, which would make assembly easy.
All of these parts were sent to the 3D printers offered at the Engineering Product Innovation Center (EPIC) at BU. It is worth mentioning that two different versions of the housing were sent to be printed in order to test which ergonomic design felt more comfortable.
Printing and Assembly
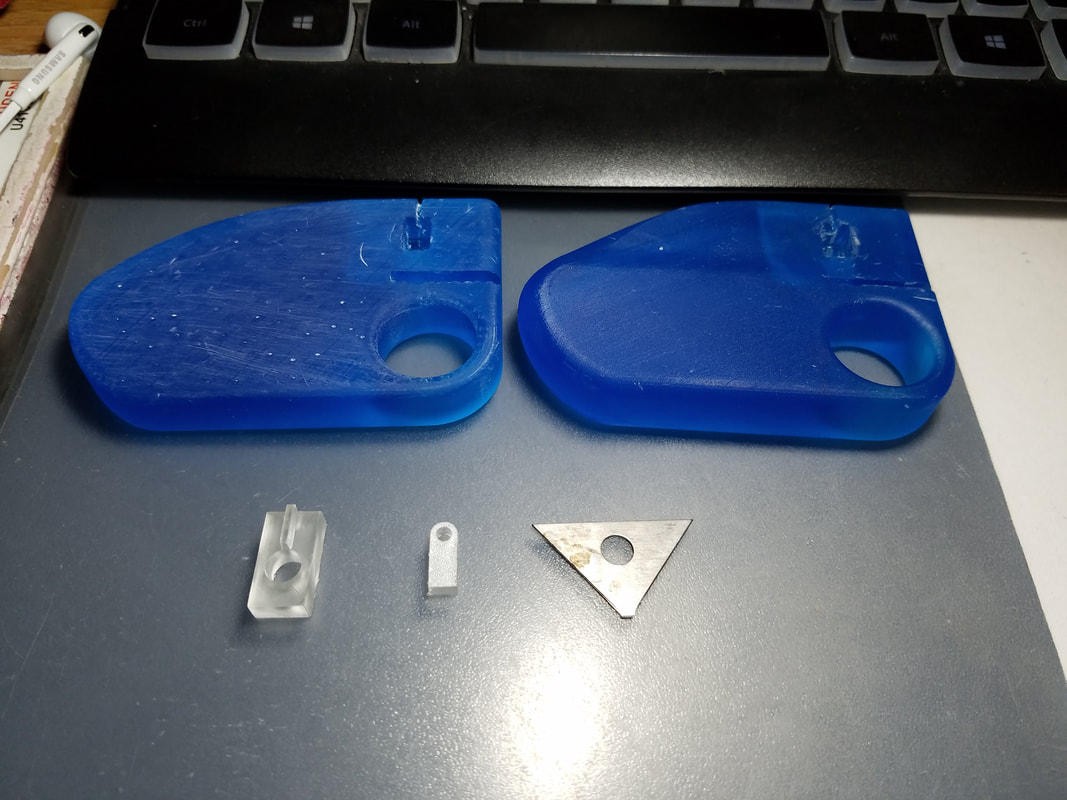
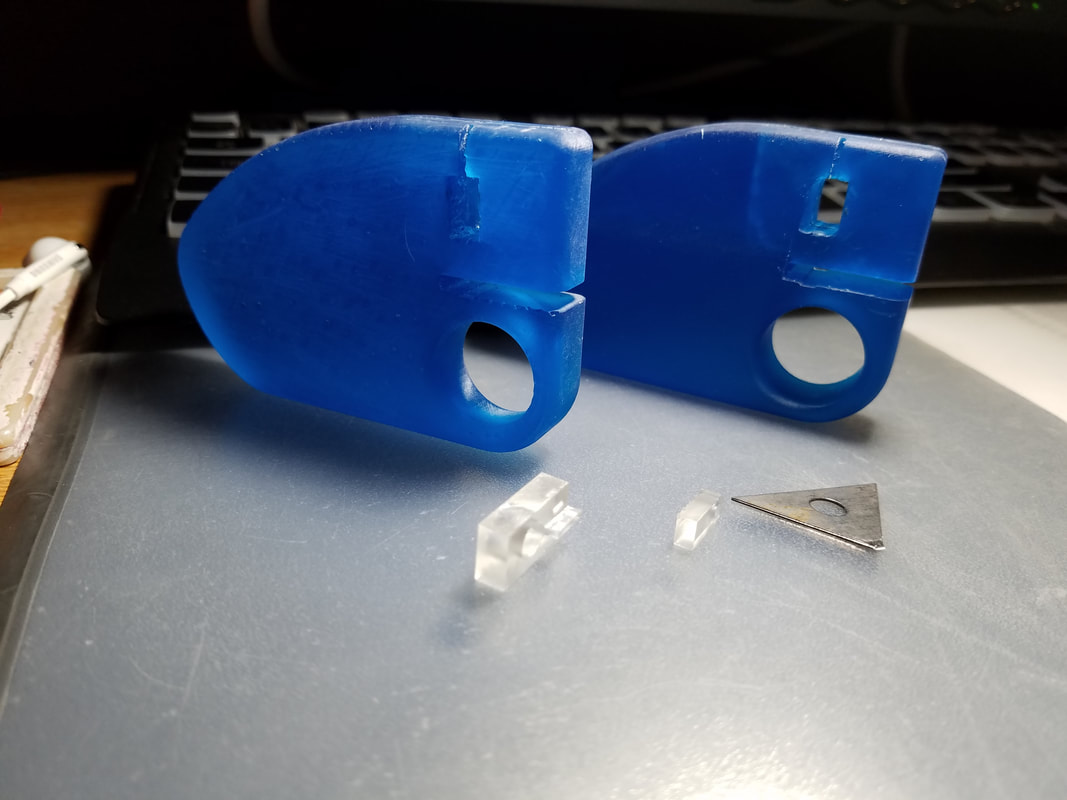
All of the parts were sent to be printed using the Form2 Stereo Lithography 3D printers. Below are images of the printed parts:
All of the parts were sent to be printed using the Form2 Stereo Lithography 3D printers. Below are images of the printed parts:
|
|
|
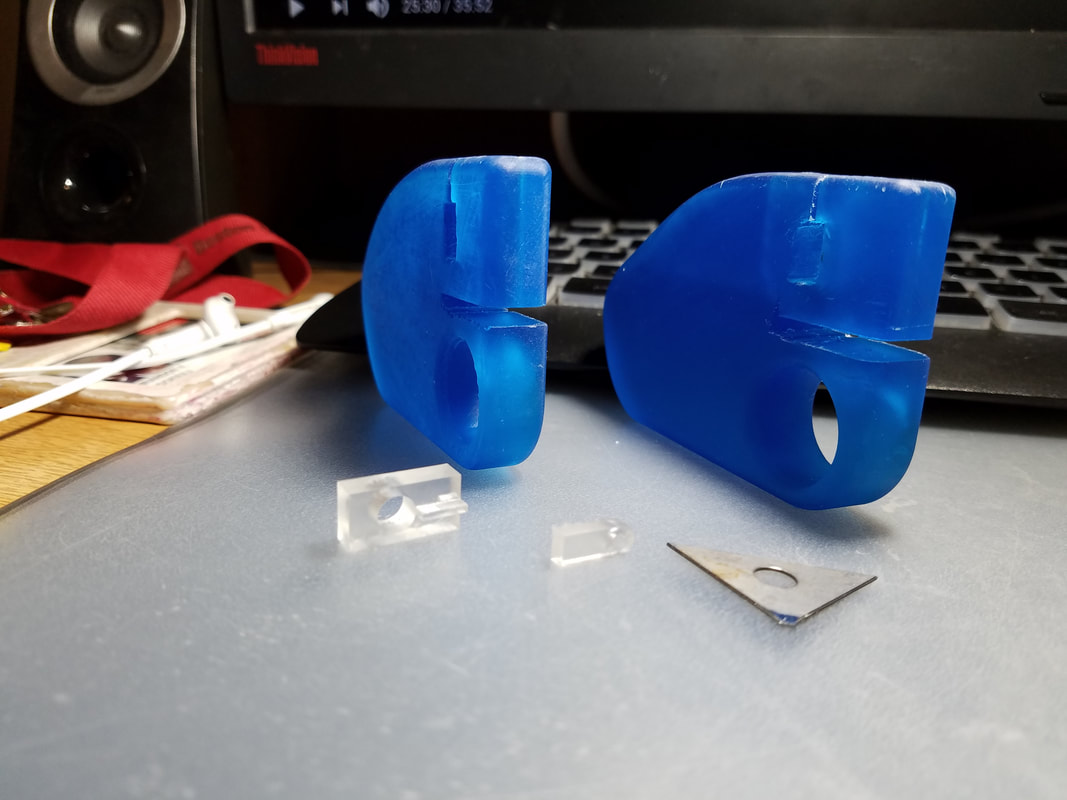
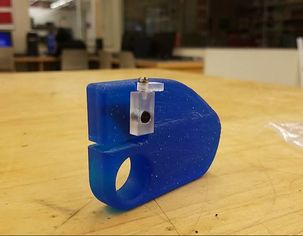
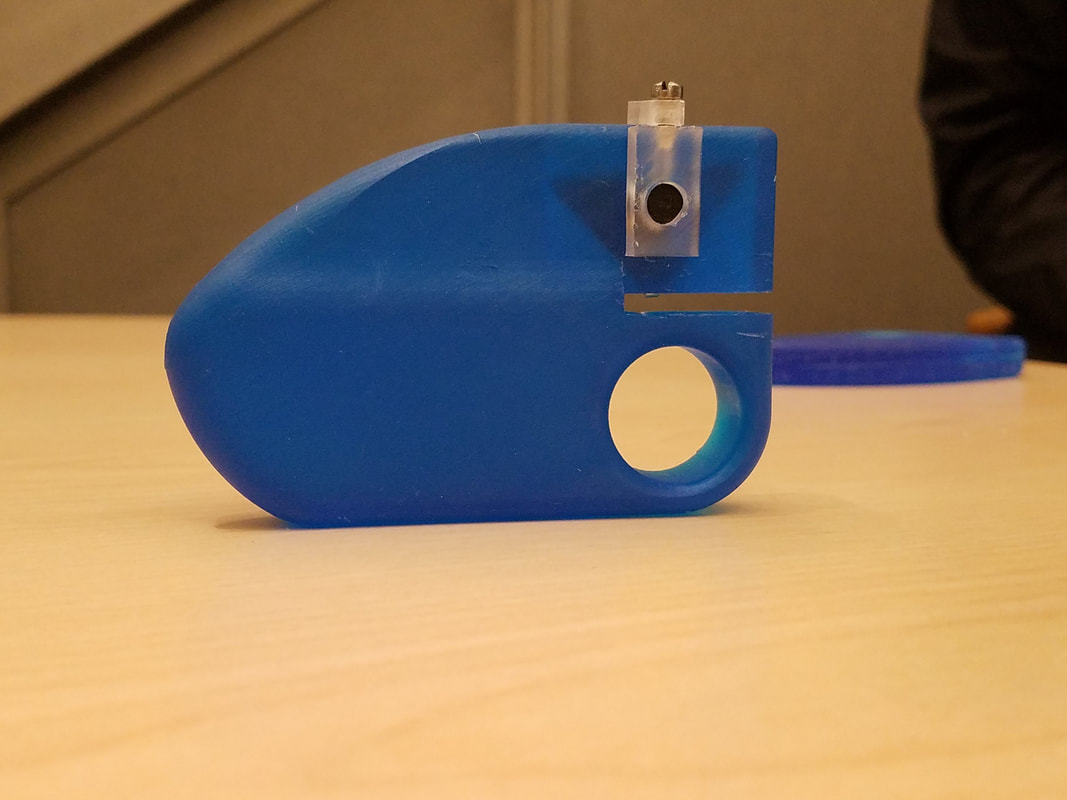
Before the assembly could begin, we first determined which ergonomic housing design felt more comfortable. It was determined that the housing on the right was better, this housing was thicker on the bottom than on the top rather than being one uniform thickness. This variable thickness that smoothly transitioned between the two ended up feeling much more comfortable as it conformed to the geometry of the hand better. With this settled, the parts were cleaned up a bit and prepared for assembly.
This product was designed to only need two fasteners. One fastener would be used to attach the safety mechanism to the plunger. The other mechanism would be used to hold the blade to the plunger and the housing, allowing it to slide up and down in order to cut. Here is the resulting product, as well as a video of it in action:
This product was designed to only need two fasteners. One fastener would be used to attach the safety mechanism to the plunger. The other mechanism would be used to hold the blade to the plunger and the housing, allowing it to slide up and down in order to cut. Here is the resulting product, as well as a video of it in action:
|

|
|
Take-Aways
There were a lot of things to consider when designing this product. For one, the asymmetry of the product was done on purpose in order to achieve a more ergonomic design. This proved to be a good design choice as it feel very comfortable to use. Another thing to consider was unwanted rotation. Originally, the design of the plunger did not include the fin that stuck into the groove of the housing. I realized that without this structure, the plunger may rotate as it is pushed, something that is very much not wanted. Additionally, the blade inside tended to rotate. This was a harder issue to solve without reprinting the housing. Circumventing that option, the solution that I recommended and we went with was to use a much thicker screw that was an interference fit with the blade. This way, the blade would not spin as it moved up and down because the screw itself would not rotate and the threads would keep it in place. This again proved to be successful, culminating in a very nicely made prototype.
There were a lot of things to consider when designing this product. For one, the asymmetry of the product was done on purpose in order to achieve a more ergonomic design. This proved to be a good design choice as it feel very comfortable to use. Another thing to consider was unwanted rotation. Originally, the design of the plunger did not include the fin that stuck into the groove of the housing. I realized that without this structure, the plunger may rotate as it is pushed, something that is very much not wanted. Additionally, the blade inside tended to rotate. This was a harder issue to solve without reprinting the housing. Circumventing that option, the solution that I recommended and we went with was to use a much thicker screw that was an interference fit with the blade. This way, the blade would not spin as it moved up and down because the screw itself would not rotate and the threads would keep it in place. This again proved to be successful, culminating in a very nicely made prototype.
