When I first entered Boston University, I was interested in joining every club that sounded interesting to me. Quite a few clubs stuck out to me and I made sure to attend at least one meeting to check it out and see how much I'd like it. For various reasons, I couldn't participate in a lot of clubs, most of them relating to my schedule. However, one club that I was able to stick with, at least for a semester, was the Unmanned Aerial Vehicle club (UAV). The UAV club's goal was to have students work on independent research with various multi-rotor vehicles. For all new members, however, they decided that the best way to have us get acclimated tot eh club was to have us work in teams to build a functioning quad-copter. Despite having a team, I was really the only one working on the quad-copter. On the upside, I was able to learn a lot about how to make a quad-copter, from mechanical design to how to program it. It was a great opportunity and it turns out that these skills would come in handy for my Senior Design project four years later.
|
Project Description: As an introductory exercise for the UAV club, the goal of this project is to learn how to build a basic quad-copter. This included investigating the best structural design, what components are required, how to wire it and organize the components on the frame, and how to program the vehicle which used a PID controller. All of the material that I learned was put into practice which resulted in the successful creation of a working, fly-able remote-controlled quad-copter.
|
|
The Design: There were a lot of things to incorporate into the design of the quad-copter. This was broken down into three main sections:
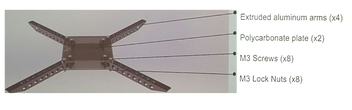
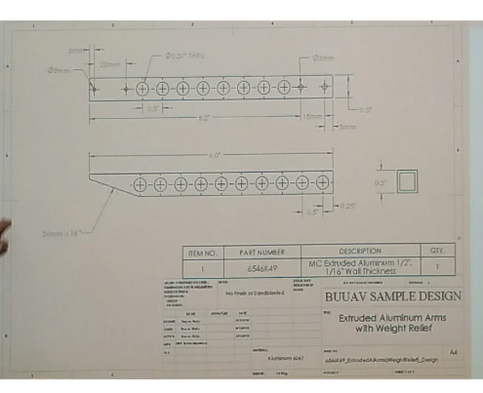
The most basic design for the frame of this type of vehicle (with the materials available to us) entailed 4 Aluminum arms that were held in place by two pieces of acrylic sandwiched together (see the CAD above). While machining the acrylic was easy, the arms had to be greatly modified from the stock material. Despite the arms being made of Aluminum, they were still too heavy to just be used without modification. Further, the arms needed screw holes to be drilled in order for the motors to be mounted securely. Therefore, in order to reduce the weight of the arms, holes were drilled across the bar and the end of the arm was cut at an angle. The angled cut was additionally useful for securing the motor to the arm as it was much easier to insert the screws into the bar through just the top side rather than through the entire thickness of the bar. Relevant screw holes were also bored to be used to attach the motors to the arm and the arms to the frame. This resulted in light-weight rotor arms that were very durable. |
|
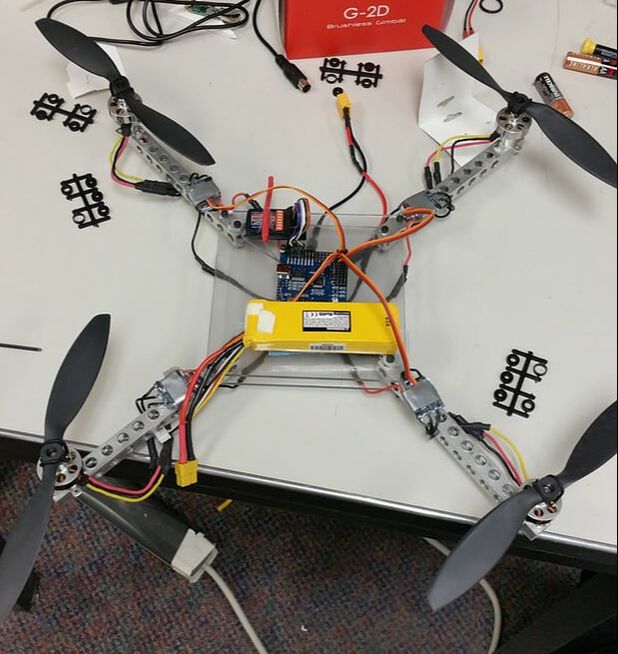
With the design of the frame completed, the next step was to add the components. The basic quad-copter design had these components:
- 4 propellers and motors
- 4 electronic speed controllers (ESCs)
- 1 Li-Po battery
- 1 flight controller
- 1 radio receiver and controller
|
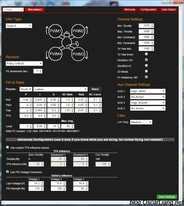
Once all of the components were fastened and connected, the last step was to adjust the controller in order to have the vehicle fly smoothly. The flight controller was configurable via a piece of computer software. When the controller was connected to a computer via a USB connection, various things could be set and adjusted such as the positions of the motor, which direction was "front" and how sensitive the PID controller was. Having no experience with PID controllers at this point, I just played around with the settings until the quad-copter was somewhat flyable. |
The Result: After a few weeks of work, I had built my first quad-copter! I was very excited that I managed to accomplish something like this as it would be my first major project that I worked on in college. While my first flight with my creation was not the smoothest, I was still over joyed that it fly and that I could control it.
Further, this would be my first foray into machining, playing around with a control software, and going through the general engineering design process. This would be a huge first step into becoming an engineer and set me up to work on bigger projects later on.
